This version of the guide is for ADCH++ versions 3.1.0 and later.
1. Introduction
ADCH++ is a hub server software for the ADC network. It is created as a reference implementation of the ADC protocol. The core application is simple, fast, effective, low on resources and made highly extensible with plugins for forks that want to implement feature additions for various use cases. ADCH++ has no architecture-specific code in itself, and is 32-bit and 64-bit portable.
The package includes a scripting plugin and Lua scrpits that implement a full-featured hub. Scripting allows hub owners to further customize the hub using the Lua scripting language. The core is also exposed to modules written in many programming languages with a Python and a Ruby interface included as examples. Thus it is possible to use and embed the core into a Python or Ruby application.
ADCH++ is free software, released under the GNU General Public License, version 3.
2. Preface
This guide is intended to novice or expert users and focuses on resource scaling, bandwidth usage optimization, advanced hub security, various scripting interfaces, development, compiling and running ADCH++ as a service / daemon as well as on troubleshooting and bug reporting.
3. Scaling the hub’s resource usage for seamless operation
3.1. Understanding the hub’s resource handling
ADCH++ is created with very low resource usage in mind so it runs in wide variety of hardware, including even older computers having fractions of system memory, CPU speed and disk space capacity of today’s standards. The low level resource usage and connectivity parameters the hub has been set up by default are targeting average systems. These settings are sufficient for running the hub in most cases, with average number of users, network traffic and number of shared files. However, in certain situations and use cases where these numbers can go higher or to the extreme, some settings should be modified for optimal operation of the hub software.
In case of these settings are too conservative the hub can easily go out of resurces. Sympthoms of resource exhaustion include, but not limited to, cases when the hub becomes laggy (less responsive) with large usercount, logged in users are getting disconnected, newly arriving users experience extensive login time or login failures (timeouts) when the hub is running or when it is (re)started.
There are three kinds of possible resource exhaustions : CPU, memory or network bandwith related ones. With default settings the first two is pretty much unlikely unless you use really ancient hardware to run ADCH++ on.
The most common cause of problems is (the lack of) network bandwidth - the hub is constantly connected to all the users and dynamically allocating network sockets and buffer memory for each client connections.
Given the way how DC hubs work their bandwidth usage is usually rather asymmetric. Most of the traffic is outbound, the hub constantly communicating with the clients, and more importantly, brodcasting searches to all clients and relaying connection requests between online clients. Usually search requests are the most significant outbound traffic from the hub to the connected users.
Given that many internet connection speeds are also asymmetric and outgoing ("upload") bandwidth is often much narrower than the other way round, a hub administrator may easily face insufficient bandwith issues running hubs with large usercounts. Quality of the connection can be also a big factor for data transfers to run smoothly.
ADCH++ use operating system provided per user buffers allocated in the memory to manage incoming traffic and to store outgoing data as long as there is enough available network bandwidth to transmit the information to the client.
If there is too much incoming data that the hub cannot process (possibly due to high CPU usage or slow storage access) then some date will stay in the buffer for longer time than normal - the buffer will eventually overflow and the data flow will stall, some data even get lost. This may result errors, timeouts or operation failures in the client side.
Buffer overflows are more likely for outgoing data (due to the bigger traffic in this direction, as explained earlier) especially when the outgoing network bandwidth getting exhausted for longer periods of time. Problems can happen when the connection quality is bad through the network route to the client. It is also possible that for some reason a DC client can’t process the data sent by the hub (in time).
ADCH++ therefore implements an additional dynamic outgoing per user buffer internally in its core as a strategy to combat against and ameliorate outgoing traffic peaks, overflows and data loss situations. These additional buffers are created and used when the fixed size socket buffer is already full.
This additional buffer has a configurable maximum size value (MaxBufferSize). As long as the size of the stalling data to be sent is bigger than this value, the user will be marked internally as "overflowing". Also there is a configurable maximum period of time of within the hub allows a user to stay in an overflowing state (OverflowTimeout). After this period the user will be disconnected to save resources.
Finally, you are also able to configure how much percent of the total online usercount can possibly be in an overflowing state (OverflowLimit), When this percentage value is reached the hub will refuse to accept new user logins until the value goes back under the limit you have set.
3.2. Setting up hub resource usage for your needs
Low level network connectivity parameters can be configured inside the <Settings> node in the adchpp.xml configuration file. The sample file in the package contains all the default settings and also some brief comments for each setting, explaining their meaning and use. Read these comments carefully to understand the effects of the various configurable parameters.
Increasing socket read/write buffer sizes (<BufferSize> parameter) and the write overflow size limit (<MaxBufferSize> parameter) should solve connectivity issues and lags, but as a consequence, the hub will allocate more memory for each user. So be careful with these settings as large values may force the hub to use too extensive amounts of memory.
The default buffer size values should be fine up to a few hundred hub users in an average hardware. However, the quality of the hub connection and increased per user traffic (e.g. large user commands, heavy shares, frequent searches etc…) may require a fine tuning of these parameters to avoid the issues explained in the previous chapter.
The hub may disconnect users (or refuse new users to login) when and until certain percent of the total usercount’s outgoing connection is stalling (their outgoing socket buffers have overflown). This can reportedly be a problem in case of low quality or low bandwith hub connections, especially when large amount of users connecting to the hub in a short timeframe, for example, when you (re)start the hub. Increasing socket buffer sizes can fix these particular issues.
The maximum percentage of users allowed being in this unwanted "overflowing" state is configurable with <OverflowLimit>. With a well-chosen value the hub can be set up to be more graceful to the connecting users with the cost of intermittent higher memory usage periods. If you experience the problems above you should try to find the best percentage value that is fixing the issue but not endangering the stability of the hub by exceeding the available free system memory.
You can also combine this approach with slight buffer size increases as feasible to get the optimal bargain. When you increasing the ratio of allowed buffer overflown users parameter (<OverflowLimit> in adchpp.xml), you may need to increase both the login (<LogTimeout>) and the owerflow (<OverflowTimeout>) timeout parameters as well to avoid mass refusing or dropping users.
Beware that large changes compared to the default values or specifying incorrect settings can easily render your hub unusable. Experiment with relatively small changes, change to only 1,5 or 2 times higher of the previous value at a time in a hope that it’ll fix the problem but remain as light as possible with the hub’s resource usage.
|
|
You can estimate the expected additional memory usage of the hub when increasing socket buffer size settings by this simple formula : ((BufferSize * 2) + MaxBufferSize) * UserCount. As a worst case scenario, additional buffer sizes above MaxBufferSize of temporarily overflowing users also needs to be taken into account. |
You always need to restart the hub for changes in these parameters to take effect. It is also advised to make a backup of the settings file before start experimenting.
|
|
Editing the values incorrectly can lead to problems so be careful what you’re doing. A settings file that doesn’t meet the XML standard may won’t be processed correctly. In case of errors try to validate the settings file syntax with an XML validator such as https://www.xmlvalidation.com |
3.3. Saving bandwidth using the Bloom plugin
ADCH++ comes with a plugin that implements a search filtering method that uses a mathemathical model called Bloom filter.
Bloom filters allow the hub to filter certain searches using some stored data that represents the hashes of the files in the users' share. The plugin allows the hub to create a map of the hashes of the shared files on the hub side, but with minimal effort, e.g. the hub doesn’t keep the full list of file hashes, but a small filter binary that, when queried, never produces false negatives but only possible false positives. This can potentially save bandwidth and resources on the client side. At login time and also later when users update (re-hash) their share, the hub, provided the Bloom plugin is enabled, will get and apply the updated filter binary arrived from Bloom supporting DC clients.
The Bloom filter plugin is enabled by default. You can enable or disable it just like other plugins as described in the Basic configuration part of the Basic User Guide.
As explained earlier the largest part of the hub connection bandwidth is used by the outgoing data of search requests, especially hash queries, relayed to all online users. The Bloom plugin tries to ameloriate the bandwidth usage of exactly that kind of requests by not passing searches to any Bloom supporting clients that don’t share the file in case, at the time. In a large hub with many active users the amount of bandwidth saved this way can be quite significant and it results potentially less resource usage at client side as well.
There are slight downsides and special behavior of this useful feature though: firstly, there’s additional bandwidth usage when clients sending their filter binary. It is an incoming data tough and incoming (download) bandwidth of the hub connections is usually plenty. A filter binary’s expected size is roughly 1,5 times of the number of shared files in client side, in bytes.
Bloom filters also require additional RAM usage of the hub as filters are stored in the memory. On the other hand, repeatedly arriving filters from the same user replaces the earlier filter so only one filter per user is stored at a time.
If you expect users sharing high number of files (10000+) visiting your hub then you possibly need to increase the sockect buffer size above the default values in order to keep using the Bloom plugin. This will help processing large incoming fliters and avoid user login issues, stalling, delays and disconnects (see the previous chapter for details).
As explained earlier the filter is updated when the number of files in the users' share are changing. This, though, may not include some edge cases when already shared files are updated in the users' share (by for example a simple edit in a single text file). This behavior depends on how DC clients report share updates to the hub.
It is possible that some udpates will not be reflected in the filter if the client is not reporting them in a precise order. This may render some updated files in a client’s share unsearchable by TTH until the next major share update or until the user reconnects to the hub.
Among the maintained DC clients, currently only DC++ guarantees the required precise share update reporting methods. Therefore for hub commumities where various DC clients are in use and this kind of small updates are often happen and files are important to be found timely (e.g. a hub for collaborative work), enabling the Bloom plugin is not recommended.
3.4. Conclusion
As a summary, you can find the most frequent use cases and suggested resource usage setup actions in a tl;dr style table as follows:
| Use case | Recommended action |
|---|---|
Ancient or slow server hardware, low memory, slow connection |
Keep or even decrease the default socket buffer size settings, set a maxium user count allowed to log in (+maxusers command), disable the Bloom plugin, carefully increase the "owerflow' settings if users getting dropped or refused to log in. |
Average memory (use of up to 500 MiB for the hub is not a problem), normal connection |
Increase the socket buffer size settings at least 2 times or even higher in case of login issues, also increase the owerflow settings if users getting dropped or refused to log in. |
Lots of memory (use of 1 GiB+ for the hub is not a problem), slow or low quality connection |
Increase the socket buffer size settings boldly until any possible issues are gone; also increase the "owerflow' settings if users getting dropped or refused to log in. |
Lots of memory, fast / high quality connection |
Increase the socket buffer size settings boldly to avoid any connectivity issues ever and just enjoy your hub :) |
Expect users with high number (10000+) of files shared |
Set the BufferSize parameter at least to the half of the largest expected number of files shared, if not enough memory to do that then disable the Bloom plugin. |
Frequent small but important share updates, collaborative work on the hub |
Disable the Bloom plugin. |
4. Advanced hub security
4.1. Secure the hub connectivity with keyprint
Connection to hubs can be unsafe in many ways and hardening the security as much as possible without sacrificing usability is always an advantage. The most common way of attack is, for example, to take the ownership of the hub address domain and divert the connected clients elsewhere. Keyprint adds a simple, but secure, way to protect against man-in-the-middle attacks, ensures that clients are always connecting to the hub they desire and not to some other maliciously set up DC hub. It is also an easier-to-use replacement of trusted certificates.
Publishing your hub’s address with keyprint included is therefore allows the users to connect to the hub more securely. The keyprint itself is a BASE32 encoded value of the SHA256 hash of the server certificate file cacert.pem. You can get your hub’s keyprint value in the following ways:
Keyprint is sent to every capable DC client when they’re connecting to an ADCH++ hub. Once connected, some of the DC clients are capable to produce the complete hub address, with the keyprint value added, usually by an item in the context menu of the hub tab (this can vary client by client). This way the owner or even any user of a secure ADCH++ hub can easily get and use a keyprint-included hub address to connect to the hub more securely.
Even if your DC client is unable to show keyprints, you can determine the hub’s keyprint value yourself. You need a hash generator tool to get the SHA256 hash of the certification file (cacert.pem). There are plenty out there and some may even come with your operating system. The OpenSSL binary is also capable of producing this hash value by using the command
openssl.exe x509 -noout -fingerprint -sha256 < cacert.pemIt will output the hash in following hexadecimal format:
SHA256 Fingerprint=26:A6:A3:6F:9A:3C:A1:BA:87:E9:F2:35:FA:2C:B3:6D:6B:28:C8:8A:22:58:E5:9D:04:8E:6C:1E:AE:BE:83:55You need to BASE32 encode the resulting hexadecimal value to get the keyprint. There are also plenty of online converting tools out there for this conversion, for example, this one. The conversion will result an encoded string similar to the following:
E2TKG342HSQ3VB7J6I27ULFTNVVSRSEKEJMOLHIERZWB5LV6QNKQOnce you’ve created your hub’s keyprint you can publish it as a part of your hub address URL. The keyprint parameter consists of a hash name, followed by a forward slash (/), followed by the generated keyprint.
adcs://example.com:1234/?kp=SHA256/E2TKG342HSQ3VB7J6I27ULFTNVVSRSEKEJMOLHIERZWB5LV6QNKQWhen DC clients that support keyprint (most which supports the latest version of the ADC protocol should do) trying to connect to your hub using an address with the keyprint parameter specified, they will now compare the hash value what your hub sends to the public keyprint and refuse to connect if they mismatch.
The only caveat of using hub addresses with keyprint is that it obviously needs to be recreated once your certificate changes or becomes invalid. Since keyprint is part of the hub URL that clients may save as favorites, a certificate change may prevent some users connecting to the hub until they also change or remove the old keyprint from the saved hub address. To avoid this you can generate a new certificate that is valid for several years before you publish your hub address with a keyprint included. The basic ADCS setup part of the Basic Guide describes how to change the validity time of the generated cerificate.
4.2. Set TLS connection parameters to harden or ease the level of security
Since version 3.0.0 ADCH++ requires TLS protocol version 1.2 or later by default for hub connections. The accepted TLS version and two other secure connection parameters can be altered so hub administrators can set up secure connectivity suitable for their needs. Ths can be done by adding extra parameters for each <Server> connection item in the <Servers> node of the adchpp.xml settings file. The following parameters are available:
-
MinVersion - specifies the minimum TLS protocol version required. Accepted values are 0…3 where 0 means TLS version 1.0 and later, 1 means TLS version 1.1 and later, 2 means TLS version 1.2 and later and 3 means TLS version 1.3, respectively. Default value is 2.
-
SecurityLevel - connection security level. Accepted values are level 0…5. For exact meaning of each level please refer to https://www.openssl.org/docs/man1.1.1/man3/SSL_CTX_get_security_level.html Default value is 1.
-
CipherSuite1_3 - A simple colon (":") separated list of TLSv1.3 ciphersuite names in order of preference. For avalilable ciphersuites and the default value please refer to https://www.openssl.org/docs/man1.1.1/man3/SSL_CTX_set_ciphersuites.html
[source,xml]
        <Servers>
                <Server Port="2780" TLS="1" Certificate="certs/cacert.pem" PrivateKey="certs/privkey.pem"
                TrustedPath="certs/trusted/" DHParams="certs/dhparam.pem"/ MinVersion="3" SecurityLevel="2"
                CipherSuites1_3="TLS_AES_256_GCM_SHA384:TLS_CHACHA20_POLY1305_SHA256">
        </Servers>
You have to restart the hub for these changes to take effect.
|
|
Be careful with these settings as invalid values can render your hub unconnectable. |
4.3. Monitor and control user behavior with guard functions
This part shows how to achieve spam, badword or badsearch protection as well as how to protect the hub’s normal operation from malicious or accidental flooding or misuse.
|
|
The prepackaged Lua scripts should be properly loaded to get the functionality described in the remaining parts of this chapter. |
4.3.1. Automatic spam, badword and badsearch protection: working with the banre commands
+banxxxre commands are very powerful tools for getting rid of unwanted text showing in mainchat or private message as well as for blocking searches containing keywords which treated malicious. These commands use Lua pattern matching method which is similar to the popular regular expressions. Usage of the commands to detect the unwanted content requires knowledge of how to construct a regular expression like filter.
|
|
For basic information about regular expressions visit: https://www.regular-expressions.info |
A quick tutorial about Lua patterns, their usage and differences to regular expressions is avalilable at Wowpedia.
| Command | Purpose |
|---|---|
+banmsgre [action] <chat-reg-exp> [reason] [expiration] |
Block chatmessages that match the given Lua pattern |
+bannickre [action] <nick-reg-exp> [reason] [expiration] |
Block nicks that match the given Lua pattern |
+banschre [action] <search-reg-exp> [reason] [expiration] |
Block searches that match the given Lua pattern |
Using the +banre commands the Lua pattern must be specified within < and > brackets. The action parameter is optional, you can skip it to achieve a simple block or set it to -1 to permanetly ban the user; any other positive number means how many minutes you want to tempban the user for. The expiration parameter is also optional, it defines when this particular rule expires (in minutes). Skipping [expiraton] results a permanent rule while specifying 0 allows you to remove this banre rule.
|
|
Removing a banre rule does NOT automatically remove the already (temp)banned users! |
+banmsgre 100 <www> unwanted spam4.3.2. Setting up limits rules
Using basic rules you can specify a few parameters the hub members should meet to use your hub. These rules provided by the clients with their periodic info data.
| Setting | Purpose |
|---|---|
maxhubcount |
Maximum number of hubs allowed, 0 = disabled |
maxhubslotratio |
Maximum hub/slots ratio allowed, 0 = disabled |
maxmsglength |
Maximum number of characters allowed per chat message, 0 = no limit |
maxnicklength |
Maximum nickname length allowed, 0 = no limit |
maxsharesize |
Maximum share size allowed in bytes, 0 = disabled |
maxsharefiles |
Maximum number of shared files allowed in bytes, 0 = disabled |
maxslots |
Maximum amount of opened upload slots allowed, 0 = disabled |
minhubslotratio |
Minimum hub/slots ratio required, 0 = disabled |
minsharesize |
Minimum share size required in bytes, 0 = disabled |
minsharefiles |
Minimum number of shared files required in bytes, 0 = disabled |
minslots |
Minimum amount of opened upload slots required, 0 = disabled |
You can set the limiting rules using the +cfgli command:
+cfgli minsharesize 1000000The limiting function is disabled by default, you can enable or disable the function globally using the
+cfgli li_limitstatssetting.
| Setting | Purpose |
|---|---|
li_limitstats |
Globaly enable/disable the limiting function, 0 = for limits enforcing only, 1 = limits enforcing and logging to a file on disk, -1 = function disabled completly |
|
|
Other settings values and logs are kept even if you globally disable the limiting function. |
There are more advanced limiting possibilities, using those you can regulate user parameters like nick length, maximum length of search strings or require special ADC client features. You can get all the available limit rules settings, their description and current values using the
+help cfglicommand.
If a user tries to breach any set rule (either when he/she is logged in or at login time) an action will be taken. For most kind of rules you can specify the action (disconnect or redirect) and also the maximum count or count/interval to be reached to make the re-attempts treated as flooding. In this case the user will be punished according the flood protection settings (described later).
You can use the following commands to specify the action and counts:
| Setting | Purpose |
|---|---|
li_exptime |
Global expire time for all enabled limit rules in minutes, it must be greater than zero. This time specifies how long the count of limit breaches will be kept for an user. If no more problems occour within the specified time interval the counts will be reset. |
li_maxcount |
Global maximum count of attempts allowed for all limit rules, 0 = disabled. If the number of attempts reach this value within li_exptime then action will be taken. |
li_maxrate |
Global maximum rate in counts/hour for all enabled limit rules, 0 = disabled. If the number of attempts reach this value then action will be taken immediately. |
li_level |
All users with level greater than this will be excluded from the limit rules like slots/hubs/sharesize, use -1 to disable. You can use this setting in conjunction with li_minlevel to apply the limit rules to certain userslevels while exclude higher and lower levels (e.g. unregistered users and operators). |
li_minlevel |
Minimum user level to apply the sharing limit rules like slots/hubs/sharesize, 0 means all users will be checked. You can use this setting in conjunction with minsearchlevel and mindownloadlevel settings to block low user levels but allow them to login without complying the rules. |
li_redirect |
Specifies the action when the sharing limit rules like slots/hubs/sharesize is breached. Set a redirect address for redirecting, if you want the user simply disconnected then leave this setting blank. This setting does not effect some of the limits counts (like maxnicklength or search related limits), those are immediately added to the flood protection counts. |
|
|
You can use both li_maxcount and li_maxrate at the same time: the specified action (li_redirect) will happen whatever value reached first. |
Every single limit setting has its own expiration and rate setting to be able to fine tune the action behaviour of the individual rules. Expiration or rate settings for an individual limit rule will always override the global settings (li_exptime and li_maxrate). The syntax of the name of the settings follows a pattern: you add _exp and _rate to the name of each limit rule setting to get the name of their corresponding individual expiration and rate settings:
+cfgli maxslots 10
+cfgli maxslots_exp 60
+cfgli maxslots_rate 5

+cfgli minschlength 3
+cfgli minschlength_exp 30
+cfgli minschlength_rate 10
To see all the current limits rules settings values in a grouped table format use the
+listlimitstatscommand.
4.3.3. Flood protection
The access.guard.lua script provides an advanced flood protection for your hub. The function is globally disabled by default but the various settings are filled with optimal parameters to start with. If you want to fine tune the flood protection you can do so as every parameter is highly configurable.
You can enable or disable the function globally using the
+cfgfl fl_commandstatssetting.
| Setting | Purpose |
|---|---|
fl_commandstats |
Globaly enable/disable the flood protection function, 0 = for flood protection only, 1 = flood protection and logging to a file on disk, -1 = function disabled completly |
|
|
Other settings values and logs are kept even if you globally disable the flood protection function. |
You can list the available individual flood protection settings using the
+help cfgflcommand.
|
|
Be careful with the settings as wrong values can easily render your hub unusable. |
Flooding attempts can be punished with widely configurable automatic response actions with step by step severity. Besides classic flooding methods, these actions can also be triggered by the repeatedly breached limit rules (see the previous chapter). The available actions are disconnect, temporary ban and full ban. These actions can happen only in this order, step by step, starting with warning(s) sent to the user and so on. The step by step manner means that a flooder will always be warned (at least once) then kicked, time banned and at last - if the flooding attepmts don’t stop - the final solution is the permanent ban. This way of action steps from warning to severe punishment allows the accidental flooder to "cool down" and retry the command/operation in an acceptable normal way. You can configure how many punishment actions should occour from one kind to step over the next one. If you set one flood protection action type’s count to zero then neither that action nor the following one in the row will ever happen. You can use the following +cfgfl settings to configure them:
| Setting | Purpose |
|---|---|
fl_exptime |
Global expire time for all flood settings in minutes, it must be greater than zero. This time specifies how long the count of detected flood attempts will be kept for a particualr user. If no more problems occour within the specified time interval the counts will be reset. |
fl_level |
All users with level greater of this setting will be affected by the flood protecting rules, -1 = disabled |
fl_maxrate |
Global maximum rate in counts/minute for all enabled flood protection rules, 0 = disabled. If the number of attempts reach this value then the next punishing action in a row will be taken immediately. |
fl_maxwarns |
Maximum amount of hammering warnings before the user is disconnected, 0 = disabled |
fl_maxkicks |
Maximum amount of kicks occoured before the user is tempbanned, 0 = disabled |
fl_maxtmpbans |
Maximum amount of tempbans before user is permanently banned, 0 = disabled |
fl_tmpban |
Sets how many minutes a user will be tempbanned after reaching the maxkicks value, 0 = disabled |
The reaction for the different kind of flooding attempts can be fine tuned with tons of parameters available in +help cfgfl. Similar to the limits settings, every flood type can have its own individual expiration and rate settings to provide maximum flexibility.
It’s possible to check how the punishing actions hit the users. There’s a log of kick and tempban events that kept for several days and can be displayed with the following commands:
+showkicklog
+showtmpbanlog
You can configure how long do you want to keep the log of the kick and tempban events with the
+cfg fl_logexptime nsetting where n is the log expire time in days for both logs.
4.3.4. Tracing users
Above the basic current information the core provides about an online user (+info <nick/CID> command) it’s possible to keep track of registered and unregistered users' activity in the hub for a given period of time (last n days). You can identify users logging on with different clients, using different nicks or arriving from various IP addresses.
The tracing function is disabled by default, you can enable or disable it globally using the
+cfgen en_entitystatssetting.
| Setting | Purpose |
|---|---|
en_entitystats |
Globaly enable/disable the tracing function, 0 = for entity logging only, 1 = entity logging to a log file as well, -1 = function disabled completly |
You can specify how long you want to trace different type of users. To see what configuration options available for enable/disable tracing individual users (entities) use the
+help cfgencommand.
You can get the trace information for any stored entity (user) by one of its three possible indentifiers using the following commands:
| Command | Purpose |
|---|---|
+tracecid |
traces the entity’s last info and history by CID (aliases: +tracebycid) |
+traceip |
traces the entity’s last info and history by IP address (aliases: +tracebyip) |
+traceni |
traces the entity’s last info and history by nick (aliases: +tracebyni) |
+showentity |
shows the current info for all entities that match either Nick, IP or CID |
        Entity                                  CID: NMEW4RRISS2RUQPU3XMK5WNGJLXSPNKSVSMPEKY
        IP:                                     180.196.324.211
        Nick:                                   user
        Client:                                 StrgDC++ 2.42
        User Level:                             2
        Changed Nick, IP, AP or Level:          0 times
        Logins:                                 16 times
        Last Logon:                             0 days, 12 hours, 26 minutes and 30 seconds ago
        Total Time Online:                      4 days, 4 hours, 0 minutes and 45 seconds
        Last Updated Nick, IP, AP or Level:     8 days, 23 hours, 51 minutes and 12 seconds ago
        Entity Regged by:                       Admin
        Entity Created:                         8 days, 23 hours, 51 minutes and 12 seconds ago
Entity Expires: in 59 days, 23 hours, 53 minutes and 48 seconds|
|
Settings values and logs are kept even if you globally disable the entity tracing function. |
4.3.5. Displaying extended hub statistics
If the acces.guard script is running it’s possible to obtain highly detailed statistics about the ADC commands used in the hub. This is an useful addition to the basic information the hub core provides with the +info command. To see the extended hub commands usage statistics use the
+listcmdstatscommand.
|
|
All statistics, traces and logs are saved so in case of a clean hub restart, shutdown or scripts reload these data is kept between sessions. |
5. PtokaX API2 bridge for ADCH++
It’s possible to create or use existing PtokaX API2 Lua scripts in your hub using the ADCHPP-PtokaX bridge script. The bridge is separately maintained and available to download at its home page. Before you go on make sure you read the documentation (README.txt) provided with the ADCHPP-PtokaX package.
|
|
To avoid problems make sure you use the revision of PtokaX bridge script corresponding to the ADCH++ version you run. |
An example folder structure of a correctly installed ADCHPP-PtokaX bridge script and some native PtokaX scripts:
Directory of c:\users\username\adchpp\Scripts

2010-05-27  18:01    <DIR>          .
2010-05-27  18:01    <DIR>          ..
2010-05-03  22:58            58 383 access.lua
2010-05-03  22:58            18 483 access.bans.lua
2010-05-03  22:58             8 242 access.bot.lua
2010-05-03  22:58             9 385 access.guard.lua
2010-05-03  22:58            18 343 access.op.lua
2010-05-26  17:26            33 141 adchpp-ptokax.lua
2010-05-03  22:58             2 653 autil.lua
2010-05-03  22:58             3 699 example.lua
2010-05-03  22:58             3 003 history.lua
2010-05-03  22:58            15 808 json.lua
2010-05-03  22:58               742 texts.lua
2010-05-27  18:01    <DIR>          px
               8 File(s)        117 544 bytes

 Directory of c:\users\username\adchpp\Scripts\px

2010-05-27  18:01    <DIR>          .
2010-05-27  18:01    <DIR>          ..
2010-05-26  19:14             4 652 px_lastip.lua
2010-05-26  18:06            15 158 px_record.lua
2010-05-26  18:02             3 935 px_tagcheck.lua
2007-12-23  12:51            13 312 px_tophubbers.lua
2010-05-26  17:50             5 918 px_topshare.lua
               5 File(s)         62 491 bytes
You can configure the PtokaX scripts using the user commands provided by the bridge script (ADCH++-PtokaX submenu in the hub context menu of your ADC client). The usage is pretty straightforward eg. when you select Add a script you will be asked where to load the scripts from. The default location is the Scripts folder so if you have the scripts in a subdirectory like in the example above then you can simply load them by specifying their relative path like (px/example_script.lua).
The bridge script will create a file named adchpp-ptokax.txt in the Config directory of the ADCH++ installation. This file lists the path of the currently added PtokaX scripts. You can edit the file to add multiple scripts in one go like in the following example (your structure may differ):
px\px_banner.lua
px\px_iprange.lua
px\px_change.lua
px\px_request.lua
px\px_rotating.lua
px\px_lastip.lua
px\px_rlsbot.lua
px\px_minchecker.lua
px\px_userdb.lua
px\px_pmfilter.lua
px\px_test.lua
px\px_profiles.lua
px\px_pmblock.lua
px\px_clock.lua
px\px_badsearch.lua
Some of the PtokaX scripts (like FreshStuff or Feedwatch) may require Lua filesystem or socket library. Since version 2.9.0 the ADCH++ repository contains these libraries and the Windows binary distributions include the compiled libraries as .dll’s.
|
|
Sometimes the libraries (.dll’s in Windows) have to be copied to the appropriate place when a PtokaX scripts search for them in esoteric paths (for example lv/libs for Leviathan). You can get more information from the README file that comes with ADCHPP-PtokaX package. |
This is the example of how the Freshstuff script should be correctly configured. Add the script as you would normally do with any scripts. The rest of the directory contents should look like this:
Directory of c:\users\username\adchpp\Scripts\px

2010-05-27  18:08    <DIR>          .
2010-05-27  18:08    <DIR>          ..
2010-05-26  18:31    <DIR>          freshstuff
2010-05-26  18:14             1 815 freshstuff.lua
2010-05-26  19:16            19 516 px_feedwatch.lua
2010-05-26  19:14             4 652 px_lastip.lua
2010-05-26  18:06            15 158 px_record.lua
2010-05-26  18:02             3 935 px_tagcheck.lua
2007-12-23  12:51            13 312 px_tophubbers.lua
2010-05-26  17:50             5 918 px_topshare.lua
               7 File(s)         64 306 bytes

 Directory of c:\users\username\adchpp\Scripts\px\freshstuff

2010-05-26  18:31    <DIR>          .
2010-05-26  18:31    <DIR>          ..
2010-05-26  18:14    <DIR>          components
2010-05-26  18:14    <DIR>          config
2010-05-26  18:15    <DIR>          data
2010-05-26  18:14    <DIR>          docs
2010-05-26  18:14            24 155 kernel.lua
2010-05-26  18:42    <DIR>          lib
2010-05-26  18:14            12 010 ptokax.lua
2010-05-26  18:14             5 775 tables.lua
               3 File(s)         41 940 bytes

 Directory of c:\users\username\adchpp\Scripts\px\freshstuff\components

2010-05-26  18:14    <DIR>          .
2010-05-26  18:14    <DIR>          ..
2010-05-26  18:14             3 503 extras.lua
2010-05-26  18:14            14 072 requester.lua
               2 File(s)         17 575 bytes

 Directory of c:\users\username\adchpp\Scripts\px\freshstuff\config

2010-05-26  18:14    <DIR>          .
2010-05-26  18:14    <DIR>          ..
2010-05-26  18:14               987 extras.lua
2010-05-26  18:14             3 182 main.lua
2010-05-26  18:14               374 requester.lua
               3 File(s)          4 543 bytes

 Directory of c:\users\username\adchpp\Scripts\px\freshstuff\data

2010-05-26  18:15    <DIR>          .
2010-05-26  18:15    <DIR>          ..
2010-05-26  18:15               125 categories.dat
               1 File(s)            125 bytes

 Directory of c:\users\username\adchpp\Scripts\px\freshstuff\docs

2010-05-26  18:14    <DIR>          .
2010-05-26  18:14    <DIR>          ..
2010-05-26  18:14             1 471 customprofile.txt
2010-05-26  18:14             4 350 development.txt
2010-05-26  18:14               201 INSTALL.txt
2010-05-26  18:14            16 755 license.txt
2010-05-26  18:14               735 README.txt
2010-05-26  18:14               644 TODO.txt
               6 File(s)         24 156 bytes

 Directory of c:\users\username\adchpp\Scripts\px\freshstuff\lib

2010-05-26  18:42    <DIR>          .
2010-05-26  18:42    <DIR>          ..
2010-05-13  16:14            13 824 lfs.dll
2010-05-13  16:14               616 lfs.dll.manifest
2010-05-26  18:14           138 240 PXLFS.dll
2010-05-26  18:14           262 144 PXLFS.tds
               4 File(s)        414 824 bytes
6. Command line parameters and service mode use
6.1. Available command line parameters
The following command line parameters are available when starting ADCH++ from the command prompt / shell:
Usage: adchpp [ [-c <configdir>] [[-d] | [-i <service name>]]] [-p <pid-file>] ] | [-v] | [-h] | [-u <service name>]-
-c Specifies the path of configuration directory (default: .\config)
-
-d Deamon service (Linux only)
-
-p <pid-file> Writes process pid to <pid-file> (Linux only)
-
-i <service name> Installs a service instance. The name specifies the name the instance will have in the services list (Windows only)
-
-u <service name> Uninstalls a service instance. (Windows only)
-
-v Prints version number
-
-h Shows the usage help message
(Linux) |
adchppd -c /home/test/adchpp/bin/config/ |
(Linux) |
adchppd -d |
(Linux) |
adchppd -p adchpp.pid |
(Windows) |
adchppd.exe -c c:/users/test/adchpp/bin/config/ |
(Windows) |
adchppd.exe -i adchpp |
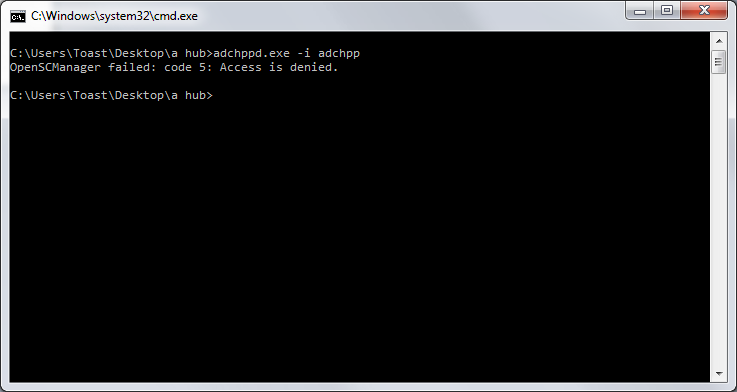
6.2. Running ADCH++ as a service module on Windows
TIP:Installing ADCH++ as a service requires the command to be run as Administrator in an elevated command prompt window otherwise UAC will interfere with the process.
This is how it looks when launched without proper rights:
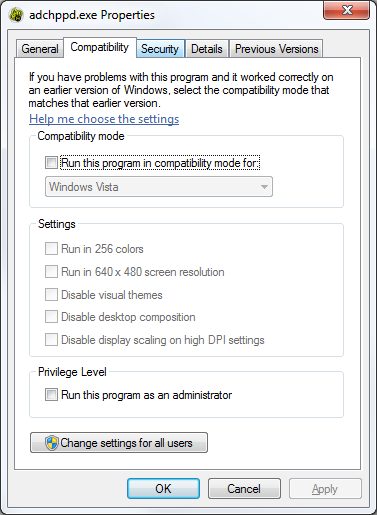
You elevate adchpp.exe in Windows the following way:
-
Right click on the application icon
-
Choose Properties
-
Go to Compatibility tab
-
Check the Run this program as an administrator box. Click OK.
-
Now execute the command adchpp -i <servicename> (example: adchpp.exe -i myserver) from the adchpp folder. If you omit the service name it will use "adchpp" by default.
-
Grant the application access when asked.
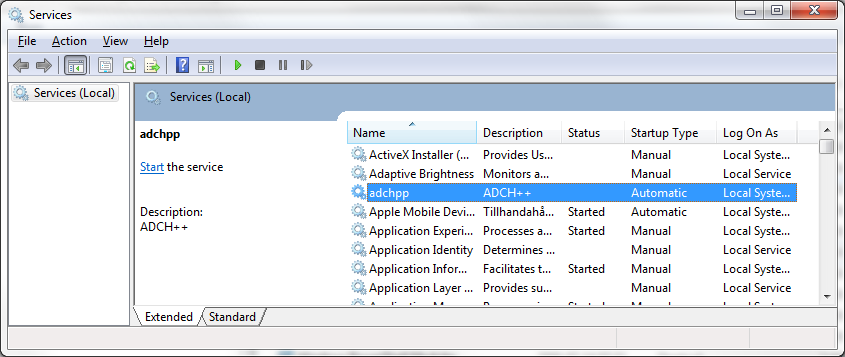
To verify that your ADCH++ service is correctly installed under the name you specified go to Control Panel\System and Security\Administrative Tools and start the "Services" application or simply run "services.msc" command from a Windows prompt.

Once the Sercvices configuration window opened you can find your adchpp service in the list:
|
|
It is possible to automatically restart the hub service in case of a crash using the Recovery settings in the service properties. |
7. Development and collaboration
7.1. Programming Interfaces
The initial aim of this project was to create a reference implementation of the ADC protocol. The core application is simple, fast, low on resources and made highly extensible with modules to be able to implement feature additions for various use cases that is out of the scope of the project. The core can be exposed to modules written in many programming languages. C++, Python and Ruby interfaces are implemented and two plugins written in C++ (Script and Bloom) are included in the /plugins folder of the package and used to provide the hub management functions and features and also to serve as examples.
7.1.1. Lua Scripting Interface and Examples
By default ADCH++ comes with prepackaged Lua scripts to handle the basic hub functions. These scripts themselves are very good examples of how to use the ADCH++ Lua API. You can also find an examlpe.lua file in /plugins/Script/examples folder of the package to be able to learn the basics.
The complete list of of the ADCH++ Lua API functions are available both in the Docs folder in the ADCH++ repository or at the ADCH++ home page.
|
|
The adchpp-lan project has additional LUA scripts examples and various improvements. |
7.1.2. Additional module interfaces
|
|
The additional module interfaces listed below are currently unmaintaned. |
Ruby Interface
Check the /rbutil folder of the package for examples.
Python Interface
Check the /pyutil folder of the package for examples.
|
|
The following adchpp forks contain examples of using Python in ADCH++ : |
Project pyIadchpp:
https://code.launchpad.net/~dcplusplus-team/+git/lanowen_adchpp_pyIadchppProject adchppgui:
https://code.launchpad.net/~dcplusplus-team/+git/sulan80_adchppgui_trunkPHP Interface
Check the /php folder of the package for initial information how to build a module in PHP.
7.2. ADC Protocol Extensions Support
The current version of ADCH++ supports the following ADC protocol extensions:
BLOM - this extension that allows hub software to create a map (bloom filter) of the shared files on the hub, but with minimal effort, e.g. the hub doesn’t keep a list of files, but a filter that never produces false negatives but only possible false positives. This can potentially save bandwidth and effort on the client side.
UCMD - User commands are used to send hub-specific commands to the client which provide useful shortcuts for the user.
ADCS - ADCS is an extension that has the goal of adding the TLS/SSL layer just over the TCP layer and beneath the application layer (where ADC runs). This way, the ADC protocol remains unchanged while the connections are encrypted.
PING - This extension can be supported by both clients and hubs, and when present, if hub supports it, it must send additional information to the client.
FO - If a hub goes down, the client’s only option is to keep re-trying the last known hub address. This extension will add a list of failover hub addresses, field FO, that the client can try to connect to, if the main hub address fail.
7.3. Problems and bug reporting
Like most software ADCH++ can also contain flaws or bugs, may preform weird or contain unwanted features. It’s important to make the developers aware of such problems. If you want to help improving ADCH++ you can file your helpful feedback to the developers about bugs found, helping to reproduce and fix these problems. Many times, to be able to help solving found issues, you must run a debug build of ADCH++. If you are on Windows and cannot compile ADCH++ in debug mode you can download nightly debug builds from the adchpp folder at DCBase Builds Archive or ask for a recent one in the dev hub at adcs://hub.dcbase.org:16591. Otherwise please follow the compilation guide provided in this document on how to build ADCH++ in debug mode.
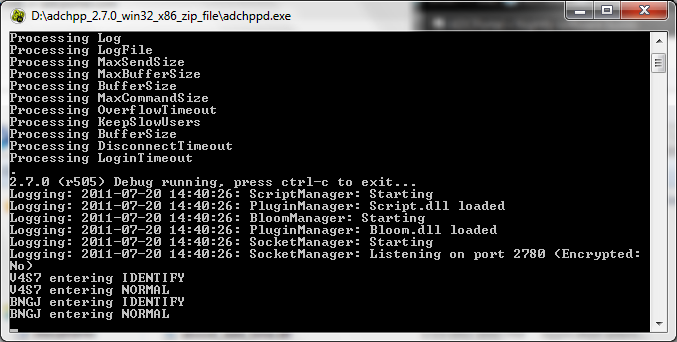
The differences between debug and release builds are as follows:
-
Debug builds are bigger and slightly slower as they contain additional information for debugging (large pdb.file)
-
The console output of a debug build is more verbose as it shows the software and parts of the protocol at work (like session ids, messages, etc.)
-
In case of problems (crashes, abnormal behavior) debug builds are able to provide vital information for the developers (crashlog)
This is how the console output of a debug build looks
7.4. Crashes and getting backtrace logs
When you encounter a crash you can help the development by reporting the bug to the official bug tracker.
To be able to analyze and solve a crash problem the developers need the following information:
-
As many details as you can provide about your system including the version of ADCH++ used, OS version, plugins, modules, etc.
-
Exact ways to reproduce the bug, a procedure that developers can follow to re-create the same problem.
-
A crash/backtrace log attached to your bug report.
7.4.1. Getting backtrace log from a GCC/MinGW compiled debug build
For getting the crash log you need to use a debugger software called GDB (GNU Debugger). For Windows, a recent GDB.exe is downloadable directly from ftp://ftp.equation.com/gdb/64/gdb.exe. This debugger is also included in the toolchain recommended for compilation, see the compilation guide provided in this document.
-
Copy the debugger program (GDB.exe) to your ADCH++ program folder
-
Open a Windows Command prompt in the ADCH++ program folder (Start Menu, Run…, type cmd and navigate to the program folder). You will get the debugging output to this command window.
-
In the Command prompt type :
gdb adchppd.exe-
When you get the debugger prompt type : r (then press <enter>).
-
This will start ADCH++, now wait for the crash (or force the crash if you know the steps how to do so)
-
When it crashes get the backtrace information by typing to the debugger prompt :
bt full-
Press <enter> so the backtrace will be generated and printed to the debug console.
-
Mark and copy the output from the command window (easiest way : right-click to the window header, from the menu choose Edit, Select All).
-
Paste the output to a new text file.
-
Then type : q (and press <enter>) to exit the debugger, this will close ADCH++ as well.
|
|
It’s the backtrace itself what may contain the most useful information so you can remove the best part of the large debug printout from the beginning of the text file. The important part is in the end, starting 10-15 lines >before< the issued bt full command and onwards. Also its wise to check if the text file you about to attach doesn’t contain any information that breaks yours or other’s privacy (IP addresses, nicks, etc…) |
-
Please report the problem at https://bugs.launchpad.net/adchpp including the backtrace log as an attachment.
|
|
The above procedure shows the way of getting backgtraces on Windows but you must be able to do it under Linux in a similar way |
7.4.2. Getting backtrace log from a build compiled with Microsoft Visual C++
You should have Microsoft Visual C++ installed and you have to use a debug build of ADCH++ compiled with MSVC. MSVC should already be registered as a JIT debugger on your system. When a crash occurs, just click "debug" on the standard crash dialog and your debugger will handle unwinding the stack, opening the correct file and showing the offending line and instructions.
7.4.3. Lua errors
You might encounter errors in the running Lua scripts as well. They will show up in the console window of ADCH++ while its running. Example:
access.lua:491: attempt to concatenate global 'reason' (a nil value)
stack traceback:
access.lua:491: in function 'dump_banned'
access.lua:579: in function <access.lua:496>
(tail call): ?
access.lua:1652: in function <access.lua:1651>
If you get errors from the core Lua scripts packaged with ADCH++, please report them to the official bug tracker at Launchpad: https://bugs.launchpad.net/adchpp
|
|
In case of other scripts, it’s best to report the errors to their respective authors, provided they’re indentifiable. |
7.5. Requirements for compiling ADCH++
ADCH++ should build fine on wide variety of systems. These are the minimum versions of tools required to compile:
-
Compiler: One of: GCC 4.9 or later (MinGW for Windows - links below) / Microsoft Visual C++ 10 (2010) or later / Clang 3.0 or later
-
Python 3.6.x or later https://www.python.org
-
SCons 4.0.0 or later https://scons.org
-
SWIG 2.0.12 or later https://www.swig.org
-
Optional: OpenSSL 1.1.1 or later, https://www.openssl.org (to have support for secure connections)
-
Optional: Ruby 1.9.2 (https://www.ruby-lang.org)
-
Optional: PHP 5 (https://www.php.net/)
-
Optional: AsciiDoc https://asciidoc-py.github.io/ (to build the documentation)
On Windows, MinGW packages by the MinGW-w64 project are preferred. The project is currently using this package by the MinGW-w64 project for official releases :
7.6. Compiling ADCH++ on ancient or unsupported systems and architectures
By default, the ADCH++ build system supports modern systems and architectures only, however, since it has no architecture-specific code and it is fully portable, with some tweaks or reverts in the build system it should build fine on old or unsupported systems as well.
To compile with older tools and libraries than currently required it is advised to revert the build system files (SConstruct / SConScript) only to a state before an actual version requirement has come into place. This way, there’s a high chance that you can build the latest code with a proper older build system revision in your unsupported OS with minimal or no changes.
|
|
For example if your system has Python 2.x only then use SCons 2.5.x or 3.x and revert the build system before the point where the project requires Python 3.x to build. |
7.7. Building ADCH++
To build ADCH++ from source you have to:
-
Install SWIG and ensure it’s in your PATH.
-
Install Python and ensure it’s in your PATH. Version 3.5 or later is recommended but with minimal changes 2.x should work as well.
-
Install SCons and ensure it’s in your PATH. You need version 2.5.x or 3.0.x for Python 2.x, version 4.0.0 or higher for Python 3.x.
-
Windows with MinGW: Install MinGW and ensure it’s in your PATH
-
Linux: Install GCC and appropriate header files, in particular, these packages spring to mind:
-
gcc-c++
-
libstdc++-devel
-
redhat: readline-devel, debian: libreadline-dev sys-libs/readline
-
-
Clang: Build with scons tools=clang. Make sure you modify tools/clang.py according to your configuration.
-
Clang Static Analyzer: Build with scons tools=clang-analyzer. Have a look at tools/clang-analyzer.py to tweak options passed to scan-build. Since the Clang Static Analyzer uses Clang, follow the above instructions for Clang configuration as well.
-
To compile with support for secure connections, you need OpenSSL:
-
Windows: compile it yourself (or download the ones already built for DC++) and put them into the "openssl" directory. Append a d to debug libs and put x64 libs into openssl/lib/x64.
-
Linux: if you don’t have it already, get the openssl-devel/libssl-dev package
-
-
In the source folder, type "scons -h" to see additional compile options
-
Type "scons" to create a debug build. "scons mode=release" will create a release build (see examples below).
|
|
For Linux see the detailed howto created for users on how to build ADCH++ on modern Linux systems; look up the "Installing on Linux" part of the Basic User Guide. |
7.7.1. Building ADCH++ with MinGW
To build a debug version use: scons
To build a release version use: scons mode=release
7.7.2. Building ADCH++ with MSVC
To build a debug version use: scons tools=default
To build a release version use: scons tools=default mode=release
7.7.3. Building the documentation
To generate the html documentation use: scons docs=1
7.8. Patches and contributions
The maintainers do accept patches in general for every part of the application, but in order to avoid future licensing issues, you’re asked to give the author the copyright over any submitted code. Make sure that the code doesn’t break support for any of the platforms supported and that it looks more or less like the rest of the code (indent, names etc). Patches should be sent to the dcplusplus-devel mailing list or to the official bug tracker at Launchpad. Please use unified patches against the latest Mercurial trunk (ie. hg diff) and supply a description of what the patch does.
7.9. Developer support
-
You can get support for ADCH++ at the project’s official Answers tracker at Launchpad.
-
You can get help, information or discuss ADCH++ development or compilation issues by logging on to the DC Development hub at adcs://hub.dcbase.org:16591.
8. Appendix
This document is published under GNU FDL
Copyright © 2010-2025 Jacek Sieka
Permission is granted to copy, distribute and/or modify this document under the terms of the GNU Free Documentation License, Version 1.3 or any later version published by the Free Software Foundation; with no Invariant Sections, no Front-Cover Texts, and no Back-Cover Texts. A copy of the license is available at https://www.gnu.org/copyleft/fdl.html